MythTV Ubuntu Dapper Installation Guide
Introduction
Installing MythTV is now easier than ever. This guide shows you how to do it using the latest Ubuntu distribution without compiling anything. I've focused on DVB for the UK, but much of it should be applicable to anybody installing Myth.
One of Ubuntu's biggest strengths is its six-monthly release cycle which gives you fairly up-to-date software on a stable platform. However, as the world of MythTV moves so fast, this means that it's very hard for Ubuntu to keep the latest version available. In fact, the Ubuntu Dapper 6.06 is currently two releases out-of-date, as it still references the old 0.18 version and not the latest and greatest, 0.20. Still, if you can live without digital text and radio, version 0.18 is still a great way to get started.
So, this guide focuses on installing MythTV version 0.18 from the multiverse repository of Ubuntu Dapper 6.06. This provides a good base for possibly compiling and upgrading to 0.20 later.
Hardware
I use a combined backend/frontend system. Take a look here for more details.
- Athlon 64 3000+
- Scythe Ninja Passive Heatsink
- Gigabyte GA-K8NSC-939 Motherboard
- Gigabyte ATI Radeon 9250 Graphics Card (passively cooled)
- 512MB Corsair DDR 3200 RAM
- Antec SLK2650-BQE Quiet Case
- Seasonic S12 380W Silent PSU
- Seagate 80GB HDD
- Edimax wireless card (Ralink RT2500 chipset)
- Western Digital 200GB HDD
- Hauppauge Nova-T DVB-T Card (with Conexant chipset)
- Hauppauge Nova-T DVB-T Card (with Philips chipset)
Ubuntu Linux
Installation
You can download the Ubuntu Dapper CD image from here. The desktop version is probably the one to go for. It installed perfectly on my admittedly generic hardware, even booting up into 1280x1024. The only things to watch are:
- When asked to enter a username, don't put mythtv. I've heard that this causes problems later on as he's created my the mythtv packages. We'll begin with your username and switch to the mythtv user later.
- Disk partitions. I've just gone with the default config of a single swap and big root partition. This is simple and flexible. If you want to be clever you can use Linux Volume Management or you could have a separate XFS partition to store your recordings.
APT Configuration
To get to the packages we want, we'll need to add some repositories. Here's my /etc/apt/sources.list. It's just the standard Ubuntu config withg the universe and multiverse repositories added.
Testing the DVB Card
Kernel Modules
The card should be autodetected by the standard kernel... it never used to be this easy!
grep DVB  /var/log/dmesg
[4294707.185000] cx88[0]: subsystem: 0070:9002, board: Hauppauge Nova-T DVB-T [card=18,autodetected]
[4294708.036000] DVB: registering new adapter (cx88[0]).
[4294708.036000] DVB: registering frontend 0 (Hauppauge Nova-T DVB-T)...
Install the Test Software
We're now going to test the card by viewing some output. For this, we'll need some DVB utilities and a movie player. As everything is so easy with Ubuntu, why not try out both xine and mplayer...?
sudo apt-get update
sudo apt-get install dvb-utils dvbstream
sudo apt-get install xine-ui mplayer-386
Watch Some TV
First, you need to search for channels in your area using the scan utility. The scan program doesn't do frequency scans, so it needs initial tuning data for at least one transponder/channel in your area. For my Winter Hill transmitter, I use the following (this is done as the root user using sudo -s):
sudo -s -H
mkdir /root/.tzap
scan /usr/share/doc/dvb-utils/examples/scan/dvb-t/uk-WinterHill > /root/.tzap/channels.conf
Note: The scan will fail if you have an old Nova-T with a TDA1004x chipset and have not loaded any firmware. See this howto before going any further.
Once you have the channel data, you can use tzap to tune into one of the frequencies:
sudo -s -H
tzap -r "BBC ONE"
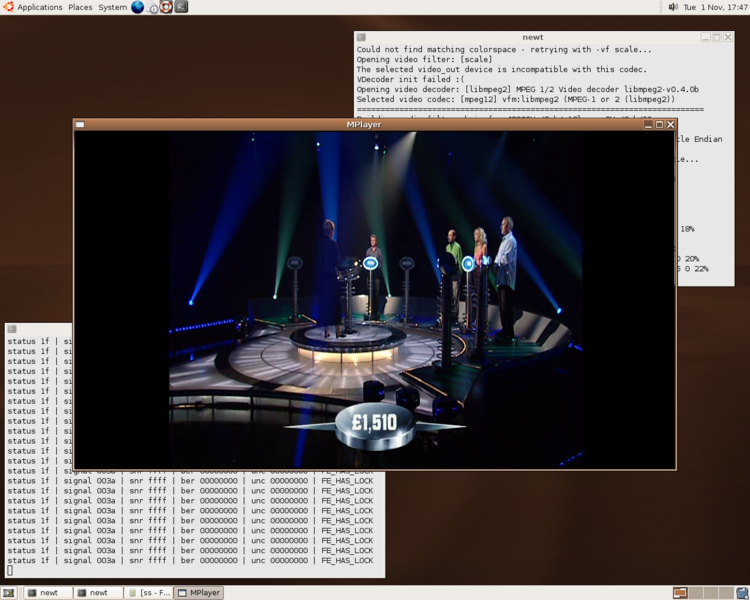
It's best to leave this going while we use dvbstream and xine or mplayer to view an actual mpeg stream:
dvbstream -o -ps 600 601 -qam 16 -cr 3_4 | mplayer -

dvbstream -o -ps 600 601 -qam 16 -cr 3_4 | xine stdin://mpeg2
Installing Myth TV
Prerequisites
Now we're almost ready to install MythTV. However, we'll install the MySQL database package first. Note that we're installing version MySQL 4.1. This very important because MySQL 5 has an incompatibility with version 0.18 of MythTV.
sudo apt-get install mysql-server-4.1
Just select "No Configuration" for postfix when prompted.
At this point, I usually select System->Administration->Services from the menu and disable unwanted daemon tasks such as postfix and cupsys.
Myth TV
Now we can finally install MythTV itself:
sudo apt-get install mythtv
It will ask you for the root database password. Hit enter if you haven't changed it.
The installation will have created a mythtv user. We'll login as him from now in, so set his password:
sudo passwd mythtv
It also makes sense to grant access rights to the mythtv user. To do this, edit the file /etc/group and mythtv to all groups that your original user is in. This will allow him to use sudo, access the cdrom etc. For example:
.
admin:x:106:garry,mythtv
.
Note that mythtv gets created with the default shell as /bin/sh. If you want /bin/bash, then set this in the /etc/passwd file.
Now, logout of your X session and login as mythtv at the GDM screen.
Myth TV Setup
To configure Myth for the first time, you run the mythtv-setup utility and step through the options:
mythtv-setup
General
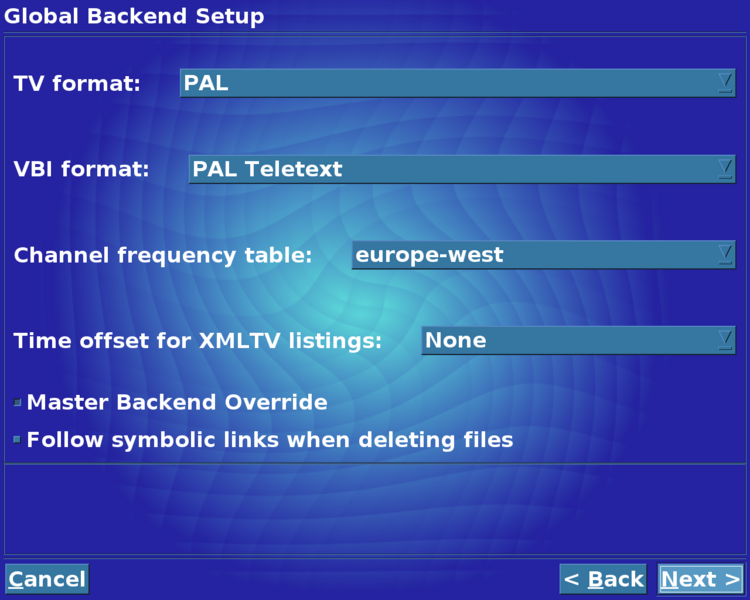 All I changed was the TV standard to PAL and the channel-frequency-table to europe-west.
Capture Card
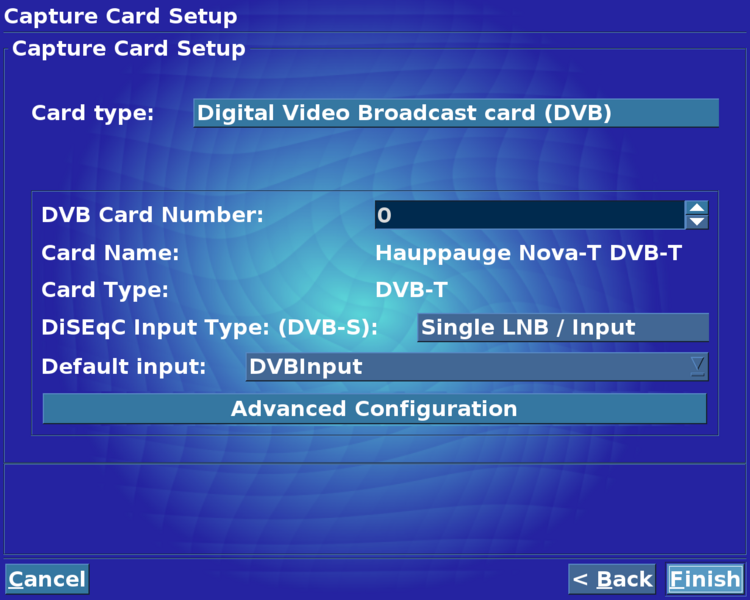 For a DVB card, change the Card Type to "Digital Video Broadcast Card (DVB)". It should detect it and show your card details.
Video Source
 This defines the source of the schedule listings. We'll be using the 14 day radio times guide, which is downloaded via the internet. There's also a guide transmitted over Freeview, but it's only 7 days and contains much less programme information.
Enter a video source name of "uk_rt". Select XMLTV listings grabber to be "UK alternative". Pressing "Finish" will display an error message. Don't worry, we'll sort this out later.
Input Connections
Set the Video source to the one we've just defined, "uk_rt". Set the starting channel to be 1 if you wish.
Channel Listings
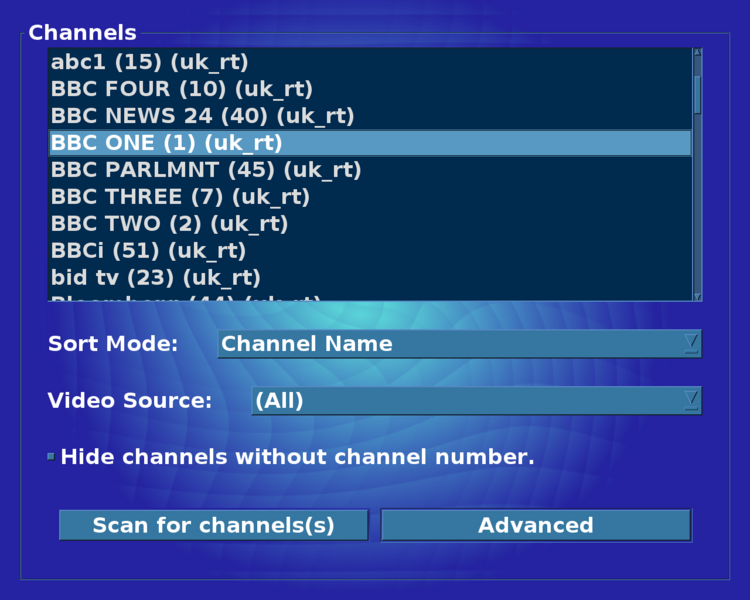 This is where it gets slightly tricky. Select "Scan for Channels" and it will present you with a screen allowing you to configure the transport type. Have a look in the /root/.tzap/channels.conf file we created earlier. The frequency is the second column. I usually enter the one for "BBC ONE". Set the Bandwidth to 8MHz. The other settings are also contained in the file, but can usually be left at AUTO.
Myth should then find all of the transports automatically and then scan for the channels. After a few minutes, the channels should appear in the list.
Testing the Configuration
Now you can exit the setup utility and start the backend. Note that this will start automatically when the system is rebooted.
sudo /etc/init.d/mythtv-backend start
Check for error messages:
tail -f /var/log/mythtv/mythbackend.log
Now run the frontend as the mythtv user:
mythfrontend
At this point, you should be able to watch TV, but the schedules won't quite work. See the next section for fixing this.
Fixing Channel Data
So, we've got our channels configured and our schedule listing feed set up, but there's one last step. We need to configure the channels table to associate the correct xmltvid and icon with each channel.
Instructions for updating the channel table can be found here:
Additional Features
Check out part 2 to find out how to get the remote control and web interfaces working:
Links
- Ubuntu Nova-T Wiki
- UbuntuGuide - general Ubuntu guide
- MythTV Ubuntu HOWTO
- MythTV on a Pundit-R - my Debian guide
- Fixing MythTV DVB Scheduling Information
- MythTV - official site
- MythTV Wiki - official wiki
- MythTV DVB Setup Guide - invaluable resource for users in the UK
- Fedora Myth(TV)ology - By Jarod C. Wilson
- Pundit MythTV Frontend - By Matt Marsh
- MythBOX - UK guide for EPIA-based systems
The End
So, that's the basic system installed. As always, feel free to drop an email to Garry if you have any comments, suggestions or just want to chat! Cheers.